How to Fix a Drywall Hole the Right Way
Most homeowners ignore that ugly hole in the wall for months. Here is everything you need to patch it properly so it actually stays fixed and blends in.
There is always one spot in the house that bothers you every single time you walk past it. Maybe a doorknob punched through the wall. Maybe movers bumped into it during a big move. Maybe you have no idea how it happened but there it is — a rough, crumbly hole staring back at you from the drywall.
The good news is that drywall repair is one of the more manageable home improvement tasks once you understand what you are actually dealing with. The bad news is that a lot of people rush through it and end up with a patch that cracks again in six months or shows through the paint like a bad scar.
This guide walks you through the whole process clearly so you can do it right the first time. And if at any point it starts to feel like more than you want to take on, our team at Trusted Fix Handyman is just a call away.
Small Hole vs Large Hole - They Are Not the Same
Repair
Before you pick up a single tool it helps to understand what type of hole you are dealing with. The repair method changes depending on size and that is where a lot of DIYers go wrong from the very start.
Small Holes (Under 4 Inches)
Nail holes, small screw pops, tiny dings from furniture — these are the easiest fixes you can do in an afternoon. A tube of lightweight spackle and a putty knife is often all you need. Some people skip sanding afterward and that is where they lose the clean finish.
Medium Holes (4 to 6 Inches)
A doorknob impact or a shallow fist-sized hole falls in this range. You will need a patch kit or a piece of drywall mesh tape along with joint compound. These take longer because you are building up layers rather than filling a single gap.
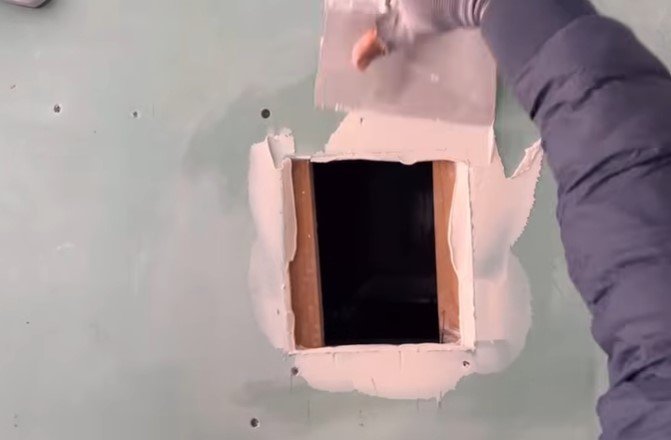
Large Holes (Over 6 Inches)
Larger damage means you are essentially cutting out a section of drywall and replacing it. This requires some carpentry knowledge since you need backing support behind the new piece. It is absolutely doable but the margin for error is smaller.
The repair method changes depending on size and that is where a lot of DIYers go wrong from the very start.
Tools and Materials You Will Need
- Putty knife or drywall knife (4 inch and 6 inch)
- Lightweight joint compound (pre-mixed works well for most repairs)
- Drywall mesh tape or a patch kit for medium holes
- Fine grit sandpaper (120 to 150 grit)
- Primer (this step gets skipped too often)
- Paint that matches your wall color
- A small piece of replacement drywall for larger damage
- Drywall screws and a screw gun for larger patches
- Corner bead if the damaged area is near an edge or corner
One thing worth saying here: the quality of your joint compound matters more than people realize. Cheap compound shrinks more as it dries which means more cracking down the road. Spend a few extra dollars on a reputable brand and you will thank yourself later.
Step by Step Drywall Hole Repair Guide
Follow these steps in order. The temptation to rush through drying time is real but it will cost you the whole repair if you do.
Clean the damaged area
Remove any loose paper, crumbling edges or debris around the hole. Use a utility knife to cut away anything that is not firmly attached. A solid edge is what your patch will bond to and skipping this step means weak adhesion from the start.
Apply mesh tape or backing for larger holes
For holes bigger than a nail pop, apply self-adhesive drywall mesh tape directly over the hole before adding any compound. For larger holes you will cut a square around the damage and attach a piece of wood or drywall backing behind the wall so your new drywall piece has something solid to screw into.
Apply the first coat of joint compound
Spread joint compound over the patch with your putty knife using smooth even strokes. Do not try to fill the entire hole in one pass. A thin first coat that feathers out several inches past the patch edges will give you a much better result than one thick blob.
Let it dry fully - this is not optional
Joint compound looks lighter when it has dried all the way through. Most people rush this step and apply the next coat over wet compound which causes cracking and uneven texture. Wait at least 24 hours in most conditions. In humid weather or during Minnesota winters with dry indoor heat this time can vary.
Sand lightly and apply a second coat
Once dry sand the first coat with 120 grit sandpaper until it feels smooth to the touch. Wipe away the dust then apply a second thinner coat of compound. This coat is about evening out the surface not adding bulk. Feather the edges wide so the patch blends with the surrounding wall.
Final sand and prime before painting
After the second or third coat is fully dry do a final light sanding until the surface feels flush with the rest of the wall. Run your hand across it in different directions – you should not feel where the patch ends. Then apply a coat of drywall primer before painting. Without primer the patched area will absorb paint differently and show through even with two coats of wall color.
Paint and blend
Use the same paint sheen as the rest of your wall. Flat paint hides imperfections better than satin or semi-gloss so keep that in mind when selecting. Feather the paint outward from the patch to help it blend into the surrounding surface.
📍 Need professional help in the Twin Cities? Learn more about our Drywall Repair Minneapolis service and what we can handle for you.
Common Mistakes That Ruin a Good Drywall
Most drywall repairs that fail do so because of one of these errors. Read through them before you start so you know what to watch for.
- Skipping the primer. Paint and raw joint compound do not bond the same way as paint and primed drywall. The patched spot will look dull or different in texture no matter how many coats you put on. Prime first.
- Applying thick coats to save time. Joint compound needs to be built up in thin layers. A thick coat will crack as the outside dries faster than the inside. Thin and patient wins every time.
- Sanding while the compound is still soft. If compound tears or balls up when you sand it is not ready. Dried compound turns a uniform light color and feels hard to the touch.
- Not feathering the edges. A patch that has hard edges will show through paint. Spread the compound several inches past the hole edges and taper it down to almost nothing at the outer edge.
- Using the wrong compound for the job. Setting compound (the kind that hardens chemically) is great for base coats but hard to sand. Lightweight finishing compound works better for top coats. Grabbing the wrong bag at the hardware store is a common mistake.
- Painting over dust. After sanding always wipe the surface down with a damp cloth and let it dry before priming or painting. Dust particles will show in your finish coat.
When to Skip the DIY and Call a Handyman
There are situations where putting the putty knife down is the smarter move. If the damage is near a load-bearing wall or if you notice the drywall feels soft or damp around the hole that can be a sign of a moisture problem underneath. Patching over moisture damage without addressing the source will just lead to the same problem again within a few months.
Large holes that span more than a foot or damage that runs along multiple walls also tend to require proper backing installation and some experience with drywall cutting. An uneven patch on a wall that is always in your line of sight is going to bother you more than it would have cost to just have it done right.
Texture matching is another area where professional experience shows. If your walls have a knockdown or orange peel texture and you have never worked with spray or stomp textures before the repair will likely look worse than the original hole once you paint over it.
And if the hole is in an area like a garage that you are planning to finish or a basement wall that will get refinished soon anyway it often makes more sense to have someone come in and do the whole surface properly rather than piecing it together yourself.
Let Trusted Fix Handle It
If the repair is bigger than expected or you just want it done right the first time give us a call. We serve homeowners across Minneapolis and the surrounding area.